Let’s cut to the chase – you’ve got a dynamite cake recipe, the oven is humming along nicely, but the pan in front of you threatens to turn your baking dream into a dessert disaster. Fear not, dear baker! A simple roll of parchment paper is about to become your secret weapon.
With a dash of know-how and a pinch of finesse, you’ll perfectly grease that cake pan and ensure your culinary masterpiece slides out with the ease of a Broadway dancer exiting stage left.
When it comes to cake baking, your number one concern should be how to prevent your freshly baked cake from sticking to the cake pan. One simple trick that has become popular is lining the cake pan with parchment paper.
How to Grease a Cake Pan with parchment paper?
- Clean and dry the pan: Before you begin, make sure your cake pan is clean and dry. Any leftover crumbs or moisture could interfere with the parchment paper’s ability to stick and create a smooth non-stick surface for your cake.
- Cut the parchment paper: Unroll your parchment paper and place your cake pan on top. Trace around the base of your pan using a pencil or marker. Once you’ve got your outline, grab your kitchen scissors and cut out the shape. For the sides of the pan, cut strips of parchment long enough to cover each side if needed.
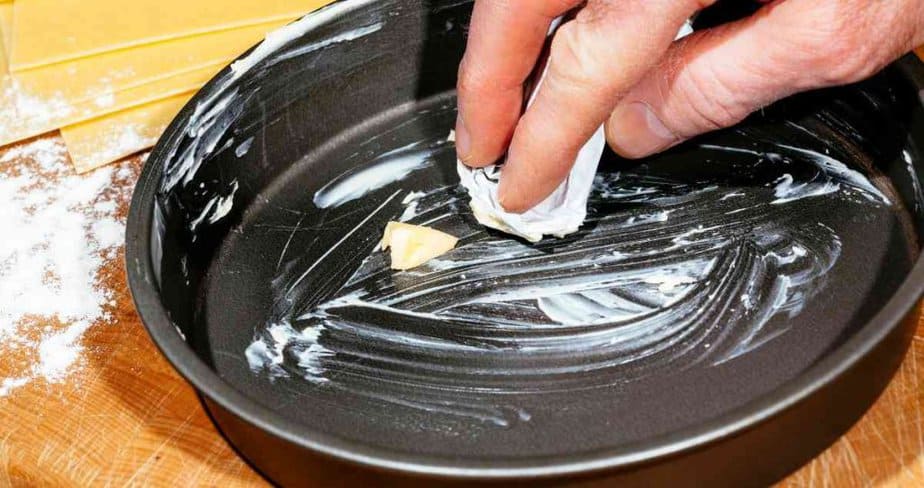
- Grease the pan lightly (optional): Although parchment paper provides a non-stick surface, some bakers prefer adding an extra layer of security. Using a bit of butter or a light spray of baking oil, lightly coat the inside of your pan. This step is especially useful if baking a cake with a high sugar content, as these are more prone to sticking.
- Place the parchment paper: Position your cut-out paper at the bottom of the pan, ensuring it fits snugly. If you’ve cut strips for the sides, place them around the interior, pressing them into the pan so they adhere well.
- Grease the top of the parchment paper (optional): Some recipes may benefit from an additional light greasing on top of the parchment paper, which can further ease the cake’s release after baking. You can apply the same butter or baking oil spray for this step in a thin layer.
Helpful Tips and Tricks for Each Step:
As you follow these steps, remember that the goal is to create a non-stick surface for an easily releasable cake. Don’t worry if your parchment paper doesn’t fit perfectly – covering the surface where your batter will contact is more important.
Common Mistakes to Avoid During the Process:
Avoid using too much grease, as this can make your cake greasy. Similarly, be careful not to skimp on the parchment paper – insufficient coverage could lead to sticking. Finally, don’t rush the process – preparing your pan properly can make a significant difference in your baking outcome.
How to Remove Cake from a Parchment-Lined Pan?
- Allow the cake to cool: Don’t rush to remove it from the pan once it is out of the oven. Let the cake cool in the pan for about 10-20 minutes. Cooling allows the cake to contract slightly from the sides of the pan, making it easier to remove.
- Loosen the edges: Using a butter knife or a thin spatula, gently loosen the edges of the cake from the pan, being careful not to gouge the sides of your cake.
- Flip the cake pan: Place a wire rack or a flat plate on top of the cake pan, then carefully flip the pan upside down. With a gentle shake, the cake should slide out of the pan, with the parchment paper stuck to the cake.
- Peel off the parchment paper: Now, gently peel off the paper from the cake. Start at one edge and slowly lift, allowing the paper to disappear. If the cake is still warm, the steam trapped under the parchment paper can help it to come off easily.
- Let the cake cool completely: Before you start frosting or cutting it, let it cool. This helps to ensure that the cake doesn’t crumble or the frosting doesn’t melt off.
Do You Grease a Cake Pan When Using parchment paper?
Yes. You have to grease the cake pan’s interior before placing parchment paper in it. This will prevent the parchment paper from sticking to the bottom of the cake pan while baking your cake. Remember, there are two types of sticking to prevent. The first one is parchment paper sticking to your cake pan, and the second is the issue of cake sticking to the surface of your parchment paper.
Do I Grease a Cake Pan Before or After Parchment Paper?
You need to grease a cake pan before you place parchment paper into it. This will prevent the parchment paper from sticking to the cake pan. You don’t have to grease a cake pan after placing parchment paper in it. This is not necessary since the parchment paper already has silicone on its surface. The silicone prevents the cake from sticking to it.
Which Side of Parchment Paper Goes Down?
The side of the parchment paper without silicone will face down, while the side with silicone will face up. This is the only way the silicone on the surface of the parchment paper can prevent the cake from sticking to the parchment paper. If you allow the silicone side to face down, it won’t be able to prevent the cake from sticking to it.
Why is it Necessary to Put Parchment Paper at The Bottom of The Pan?
It is necessary to put parchment paper at the bottom of the cake pan so that it can prevent cake from sticking to the parchment paper or to the pan itself.
 Final Words
To prevent your cake from sticking to your cake pan after baking, it is necessary to apply grease to the interior of the cake pan before placing parchment paper in the cake pan, with the silicone side facing up. The thin silicone layer can only prevent cake from sticking if it faces up. And that’s what you should always do.
- What is a Stock Pot Used for in Cooking? - September 5, 2023
- How to Make Turkey Stock in Instant Pot - September 5, 2023
- How to Make Gravy from Pot Roast Stock - September 5, 2023


